Yajra DataTables is an Jquery Based Table Viewer which provides advanced control to HTML such as pagination, Search Sorting, and other filters for dynamic data. Datatables is a jQuery extension that allows users to add advanced interaction controls to your HTML table data. Datatables also include ajax support for data search and retrieval. You can provide very fast layouts for searching and sorting by using Datatables.
Just follow the steps to implement datatables in your Laravel application. In this case, I will provide you with the best Method to Implement Yajra DataTables.
Step 1 : Laravel Installation Process
First of all You need to Install Laravel over your Xampp Server or Wamp Server. You have to execute this command inside root Folder given below:
composer create-project --prefer-dist laravel/laravel brotech4u-datatable
Step 2 : Configure Database and other Settings
After Installation of Laravel, You have to configure Database inside the .env file.
DB_CONNECTION=mysql
DB_HOST=127.0.0.1
DB_PORT=3306
DB_DATABASE=brotech4u_db
DB_USERNAME=brotech4u_user
DB_PASSWORD=brotech4u_password
Also Read : How To Create Dynamic Sitemap in PHP and MYSQL
Step 3 : Yajra DataTables Installation
For Yajra DataTables, we need to execute Composer Command. Please execute command given below:
composer require yajra/laravel-datatables-oracle:"~9.0"
Step 4 : Insert Dummy Data
I this Step we will create some dummy users with the help of tinker Factory. Here are the commands to create dummy users given below:
php artisan tinker

User::factory()->count(500)->create()
Step 5 : Create Routes
In this Step , We will create a routes for Yajra DataTables Layout inside routes/web.php file
<?php
use Illuminate\Support\Facades\Route;
use App\Http\Controllers\UserController;

Route::get('users', [UserController::class, 'index'])->name('users.index');
Also Read : How To Integrate Payumoney Payment Gateway In PHP
Step 6 : Create Controller for Yajra DataTables
In this Step, We wil create a User Controller to manage Layouts and get data request and their return response. The code given below:
<?php
namespace App\Http\Controllers;

use Illuminate\Http\Request;
use App\Models\User;
use DataTables;

class UserController extends Controller
{
    public function index(Request $request)
    {
        if ($request->ajax()) {
            $data = User::select('id','name','email')->get();
            return Datatables::of($data)->addIndexColumn()
                ->addColumn('action', function($row){
                    $btn = '<a href="javascript:void(0)" class="btn btn-primary btn-sm">View</a>';
                    return $btn;
                })
                ->rawColumns(['action'])
                ->make(true);
        }
        return view('users');
    }
}
Step 7 : Blade File For View Users Listing
I this Step, We will create a users.blade.php file inside “resources/views/” directory for layout and designs. Html code Given below:
<!DOCTYPE html>
<html>
<head>
    <title>Yajra DataTables By Brotech4u Tutorial</title>
    <meta name="csrf-token" content="{{ csrf_token() }}">
    <link rel="stylesheet" href="https://cdnjs.cloudflare.com/ajax/libs/twitter-bootstrap/4.1.3/css/bootstrap.min.css" />
    <link href="https://cdn.datatables.net/1.10.16/css/jquery.dataTables.min.css" rel="stylesheet">
    <link href="https://cdn.datatables.net/1.10.19/css/dataTables.bootstrap4.min.css" rel="stylesheet">
    <script src="https://ajax.googleapis.com/ajax/libs/jquery/1.9.1/jquery.js"></script>
    <script src="https://cdnjs.cloudflare.com/ajax/libs/jquery-validate/1.19.0/jquery.validate.js"></script>
    <script src="https://cdn.datatables.net/1.10.16/js/jquery.dataTables.min.js"></script>
    <script src="https://stackpath.bootstrapcdn.com/bootstrap/4.1.3/js/bootstrap.min.js"></script>
    <script src="https://cdn.datatables.net/1.10.19/js/dataTables.bootstrap4.min.js"></script>
</head>
<body>
<div class="container">
    <div class="row">
        <div class="col-12 table-responsive">
            <table class="table table-bordered users">
                <thead>
                    <tr>
                        <th>No</th>
                        <th>Name</th>
                        <th>Email</th>
                        <th width="100px">Action</th>
                    </tr>
                </thead>
                <tbody></tbody>
            </table>
        </div>
    </div>
</div>
</body>
<script type="text/javascript">
  $(function () {
    var table = $('.users').DataTable({
        processing: true,
        serverSide: true,
        ajax: "{{ route('users.index') }}",
        columns: [
            {data: 'id', name: 'id'},
            {data: 'name', name: 'name'},
            {data: 'email', name: 'email'},
            {data: 'action', name: 'action', orderable: false, searchable: false},
        ]
    });
  });
</script>
</html>
Also Read : How To Integrate Payumoney Payment Gateway In Laravel
Step 8 : Start Server
php artisan serve
Now you have to start Laravel Server through command given below:
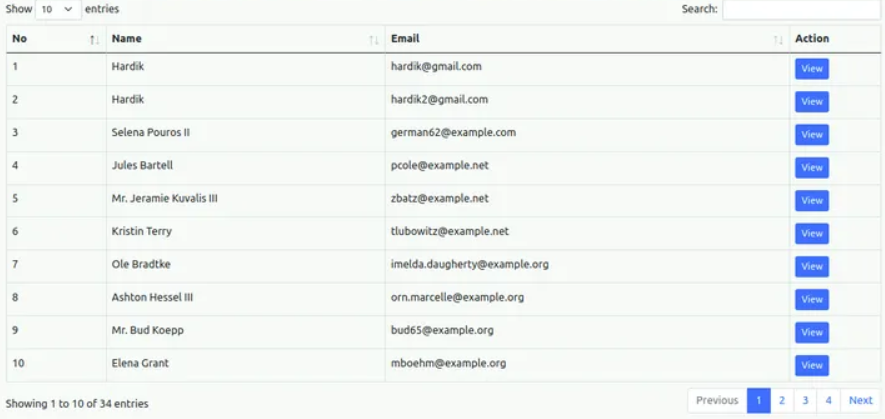
Now open your Browser and execute this url : http://localhost:8000/users . Here you will get all users lists from the database through Yajra DataTables Library.
For more Information, You can check official documentation at https://yajrabox.com/docs/laravel-datatables/master/installation